Protein cheesecake jars are one of those desserts I like making when I want something creamy and satisfying without preparing a full-size cheesecake. Everything is made in individual jars, so there is no need to slice and serve a whole cheesecake later. Each jar has its own buttery graham cracker base, smooth vanilla cheesecake filling, and a spoonful of cherry pie filling on top.
What I particularly like about this method is that it feels much simpler than making a traditional cheesecake. There is no springform pan to prepare and no complicated decorating. Once the jars are baked, chilled, and topped with cherries, they are ready to keep in the refrigerator for an easy dessert or make-ahead treat.
The filling uses cream cheese along with Greek yogurt, cottage cheese, and vanilla protein powder. These ingredients give the cheesecake its creamy consistency while adding protein to each serving. The result is still recognizably cheesecake: rich, tangy, vanilla-flavored, and finished with sweet cherries.
Getting Everything Ready
- Before starting, I take the cream cheese, Greek yogurt, cottage cheese, and egg out of the refrigerator and let them come to room temperature. This small step makes a noticeable difference when making the filling.
- Cold dairy ingredients can be difficult to blend completely. The cream cheese may remain in small pieces, while the cottage cheese can leave little lumps in the mixture. When everything has had some time to warm up, the ingredients blend together much more easily.
- I also prepare the five jars before mixing the filling. Wide-mouth jars with a capacity of 250 milliliters work well because they are easy to fill and make it simple to add the topping later.
Preparing the Graham Cracker Base
- I start by making the crust because it needs a short bake before the filling goes in.
- For the crust, I mix the melted butter with the graham cracker crumbs, sugar, and salt. The melted butter should coat the crumbs evenly so the mixture holds together when pressed into the jars.
- The small amount of sugar gives the crust some extra sweetness, while the salt keeps the flavor from becoming too flat. I find that the combination works particularly well with the tangy cheesecake filling.
- Once everything is mixed, I divide the crust mixture between the five jars. I press it gently into the bottom of each jar. There is no need to pack it down extremely firmly. A light, even layer is enough to create a solid base for the cheesecake.
- I place the jars into a baking pan and pre-bake the crust for ten minutes. This gives the graham cracker layer a chance to set before the filling is added.
Making the Creamy Vanilla Filling
- While the crust is baking, I prepare the filling.
- The cream cheese goes into the blender first, followed by the sugar, Greek yogurt, cottage cheese, vanilla protein powder, egg, and vanilla extract. Since the ingredients are already at room temperature, they blend much more smoothly.
- I blend everything until the mixture is completely smooth. Usually, thirty seconds to one minute is enough. I avoid blending longer than necessary because too much blending can introduce a lot of air into the filling.
- The cottage cheese is an important reason for using a blender here. It needs to break down properly so the finished cheesecake has a creamy texture rather than small pieces throughout it. The blender also helps incorporate the protein powder evenly.
- When the mixture is ready, it should look smooth and creamy without visible lumps.
Filling the Jars
- Once the crusts have had their ten-minute bake, I carefully divide the vanilla filling between the five jars.
- I try to distribute the filling as evenly as possible so the jars finish baking at about the same time. Each jar should be approximately eighty percent full, leaving some space at the top.
- There is no need to fill the jars completely because the filling needs a little room during baking.
- At this point, the jars go back into the baking pan. The next step is the water bath, which is an important part of getting an evenly cooked cheesecake
Setting Up the Water Bath
- I pour hot water into the baking pan around the jars. The water should come about halfway up the sides of the jars.
- The water bath creates a gentler baking environment. Instead of the jars being exposed to dry oven heat alone, the surrounding hot water helps moderate the temperature around them.
- This is especially useful for cheesecake because the edges can otherwise cook much faster than the middle. A water bath helps the filling cook more evenly and keeps the finished texture creamy.
- I pour the water carefully so none of it gets into the jars
The Gentle Baking Method
- The oven is already set to 300°F, which is intentionally lower than the temperature often used for traditional cheesecake.
- I bake the filled jars for thirty minutes.
- After those thirty minutes, I turn off the oven but leave the jars inside. I do not open the oven door. The jars stay in the turned-off oven for another hour.
- This second stage is one of the most important parts of the recipe. The remaining heat in the oven continues cooking the cheesecake gently without exposing it to the stronger direct heat of an actively running oven.
- Opening the door during this time lets out heat and can interfere with the finishing process, so I leave the oven closed for the full hour.
Cooling the Cheesecakes
- After the one-hour finishing period, I carefully remove the jars from the oven and take them out of the water bath.
- They need to cool before going into the refrigerator. Once they have cooled to room temperature, I cover the jars and refrigerate them.
- The cheesecake needs approximately four hours in the refrigerator to become properly set. I prefer allowing enough time for this step rather than trying to serve them too soon.
- The filling becomes firmer as it chills, and the flavors settle together. If I am preparing these ahead of time, they can also be refrigerated overnight.
Adding the Cherry Topping
- I keep the cherry topping simple by using E.D. Smith Cherry Pie Filling, or an equivalent cherry pie filling.
- Once the cheesecakes are completely chilled and set, I spoon the cherry pie filling over each jar.
- The cherries add both sweetness and a little tartness, which works nicely against the creamy vanilla filling. They also give the jars a finished appearance without requiring any additional decorating.
- I add the topping after chilling rather than before baking so the cherry filling keeps its texture and remains distinct from the cheesecake layer.
Serving the Cheesecake Jars
- Although these cheesecake jars can be eaten directly from the refrigerator, I like letting them sit at room temperature for about thirty minutes before serving.
- Very cold cheesecake tends to be firmer and its flavors can seem slightly muted. Giving it a short amount of time to warm up softens the filling and makes the vanilla and cherry flavors easier to appreciate.
- The final texture should be creamy and firm enough to eat with a spoon while still feeling soft and rich.
A Few Things That Make a Difference
- Use the Right Jar
- I use wide-mouth 250-milliliter jars so the portions remain consistent. The wide opening also makes it much easier to add the crust, filling, and cherry topping.
- Different-sized jars can change the baking time. Smaller jars may cook more quickly, while larger jars can take longer, so keeping the jar size consistent is helpful.
- Don’t Skip Room Temperature Ingredients
- The filling depends on several dairy ingredients, so starting with them at room temperature makes blending much easier. This is especially important for the cream cheese and cottage cheese.
- If the ingredients are cold, the filling may not become completely smooth even after blending.
- Don’t Overfill the Jars
- Leaving some space at the top gives the filling room during baking. Filling the jars to approximately eighty percent keeps the layers manageable and leaves enough space for the cherry topping later.
- Keep the Oven Closed
- Once the thirty-minute baking time is complete, the oven is turned off and the jars remain inside for one hour.
- I leave the oven door closed throughout this period. The stored heat is what allows the cheesecakes to finish cooking gradually.
- Let Them Chill Properly
- Four hours is the recommended chilling time, but an overnight chill works well if the cheesecake jars are being prepared in advance.
- The refrigerator gives the filling time to firm up and develop its final texture.
- Adjusting the Sweetness
- The recipe uses 50 grams of sugar in the filling and one teaspoon of sugar in the crust. The cherry pie filling also contributes sweetness.
- The sugar in the recipe can be adjusted according to taste without changing the basic method. If a less-sweet cheesecake is preferred, the amount of sugar can be reduced. If a sweeter dessert is desired, it can be increased.
- Alternative sweeteners can also be used, although changing the sweetener may affect the flavor and texture slightly.
- Other Crust Ideas
- The graham cracker crust gives these jars a familiar cheesecake flavor, but the same basic idea can be adapted with other crumb-based crusts.
- Digestive biscuits, oatmeal cookies, or almond meal can create different textures and flavors. A different crust can also be useful when making several batches and wanting some variety.
- The important thing is to maintain enough of the crumb mixture to create a stable base beneath the filling.
- Changing the Fruit Topping
- Cherry pie filling is an easy topping because it requires no additional preparation. However, other fruit toppings can also be used.
- Fresh berries, peaches, jams, or fruit compotes can all be spooned over the chilled cheesecakes. Different fruit toppings can change the flavor of the dessert while keeping the same vanilla cheesecake base.
- For a mixed batch, different jars can even be finished with different fruit toppings
- Making the Recipe Without Protein Powder
- The vanilla protein powder can be left out if it is not wanted. The recipe will still produce a creamy cheesecake, although the protein content will be lower.
- Without the protein powder, the filling can also have a slightly lighter and more delicate texture. The remaining cream cheese, Greek yogurt, cottage cheese, egg, and vanilla extract still provide the familiar cheesecake flavor.
- Storing the Jars
- Once prepared, the cheesecake jars should be kept refrigerated and covered.
- They stay fresh for approximately three to four days when properly stored in the refrigerator. Keeping the jars covered helps prevent them from absorbing other refrigerator odors and helps maintain their texture.
- Because the recipe contains cream cheese, Greek yogurt, cottage cheese, and egg, refrigeration is an important part of storage.
- For the best texture, I keep the jars chilled until they are ready to serve and add the cherry topping once the cheesecakes have fully set
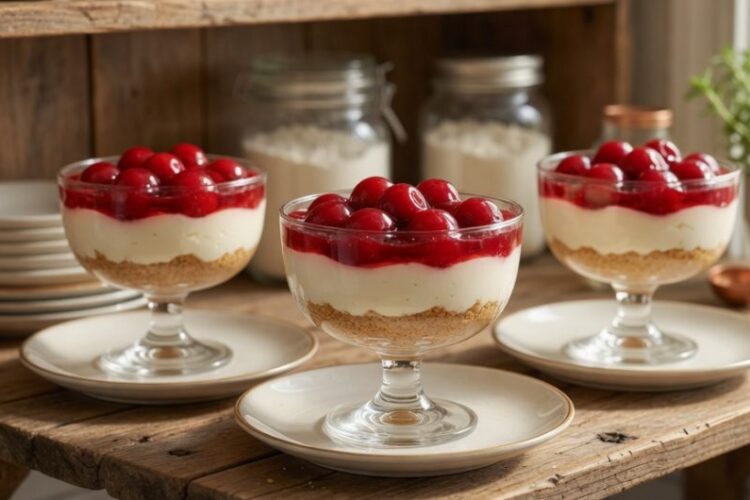
High Protein Cheesecake Jars
 Recipe by admin1
Creamy individual cheesecake jars made with cream cheese, Greek yogurt, cottage cheese, and vanilla protein powder over a buttery graham cracker crust. Each jar is finished with sweet cherry pie filling for a simple protein-rich dessert that is easy to portion, refrigerate, and serve.
5
servings20
minutes1
minute350
kcal21
minutesIngredients
57 grams butter, melted (approximately 1/4 cup)
150 grams graham cracker crumbs (approximately 1 1/4 cups)
1 teaspoon sugar
1/2 teaspoon salt
226 grams cream cheese (one 8-ounce brick), at room temperature
50 grams sugar (1/4 cup)
120 grams Greek yogurt (1/2 cup), at room temperature
120 grams cottage cheese (1/2 cup), at room temperature
30 grams vanilla protein powder (1 scoop)
1 large egg, at room temperature
1 teaspoon vanilla extract
1/2 can E.D. Smith Cherry Pie Filling (or equivalent)
Directions
- Prepare the oven: Preheat the oven to 300°F.
- Make the crust: Mix the melted butter, graham cracker crumbs, sugar, and salt until evenly combined.
- Fill the jars: Divide the crust mixture between five 250-milliliter wide-mouth jars and gently press it into the bottoms.
- Pre-bake: Place the jars in a baking pan and bake the crusts for 10 minutes.
- Blend the filling: Add the room-temperature cream cheese, sugar, Greek yogurt, cottage cheese, vanilla protein powder, egg, and vanilla extract to a blender. Blend for 30 seconds to 1 minute, or until completely smooth.
- Add the filling: Divide the cheesecake mixture evenly among the five jars, filling each approximately 80% full.
- Prepare the water bath: Place the jars in the baking pan and carefully add hot water until it reaches halfway up the sides of the jars.
- Bake: Bake at 300°F for 30 minutes.
- Finish in the oven: Turn the oven off and leave the jars inside for 1 hour. Do not open the oven door during this time.
- Cool and chill: Remove the jars from the water bath and allow them to cool to room temperature. Cover and refrigerate for approximately 4 hours, or overnight.
- Add the topping: Spoon cherry pie filling over each chilled cheesecake.
- Serve: For the best texture and flavor, allow the jars to sit at room temperature for approximately 30 minutes before serving.
Notes
- Use 250-milliliter wide-mouth jars for consistent portions and baking times.
- Bring the cream cheese, Greek yogurt, cottage cheese, and egg to room temperature before blending
- Do not over-blend the filling, as excessive blending can incorporate too much air.
- Keep the oven closed during the one-hour finishing period after turning it off.
- The cheesecakes can be refrigerated overnight for a firmer texture.
- Keep covered and refrigerated for approximately 3–4 days.
- The protein powder may be omitted if desired; the finished cheesecake will have a lower protein content and a slightly lighter texture.
- Cherry pie filling can be replaced with other fruit toppings such as berries, peaches, jams, or fruit compotes.
Nutrition Facts
- Total number of serves: 5
- Calories: 350kcal
- Protein: 16g


