Homemade Keto Bounty Bars are one of those treats that are surprisingly easy to prepare with only a handful of ingredients. They combine a soft coconut filling with a smooth chocolate coating to create a dessert that is rich, satisfying, and suitable for anyone following a low-carb lifestyle. Since they require no baking, they are perfect when I want to make something sweet without spending hours in the kitchen.
I enjoy making these bars because the recipe is straightforward and easy to customize while keeping the same delicious coconut flavor. The filling has a creamy texture from coconut cream and coconut oil, while the desiccated coconut gives every bite a pleasant chewiness. Once coated in dark chocolate, the bars become a homemade version of the classic coconut chocolate candy.
The recipe works well for everyday desserts, special occasions, homemade edible gifts, or simply as a sweet snack to keep in the refrigerator. Since the bars freeze beautifully, I often prepare a batch ahead of time and enjoy them whenever I need a quick treat.
Why These Homemade Bars Are Worth Making
- There are many reasons why this recipe has become one of my favorite homemade desserts.
- Rich Coconut Flavor
- The coconut filling is the highlight of this recipe. Using both coconut cream and desiccated coconut creates a filling that is moist, creamy, and full of natural coconut taste. Every bite delivers the classic coconut flavor without becoming overly sweet.
- Low-Carb Friendly
- These bars are made with ingredients commonly used in keto and low-carb kitchens. They contain very few carbohydrates per serving while still satisfying sweet cravings. They are also free from refined sugar when prepared with a sugar-free sweetener and sugar-free dark chocolate.
- No Baking Required
- One of the biggest advantages of this recipe is that it doesn’t require an oven. After mixing the filling, the bars simply need time in the freezer before being dipped into melted chocolate. This makes the recipe especially convenient during warm weather or when I want an easy dessert.
- Easy to Prepare in Advance
- These bars store very well in both the refrigerator and freezer. Preparing them ahead of time means there’s always a homemade dessert ready whenever I want something sweet.
Choosing the Right Ingredients
- Although the ingredient list is short, each ingredient contributes to the final texture and flavor.
- Coconut Oil
- Coconut oil acts as the main binding ingredient for the filling. Once chilled, it helps the bars become firm enough to dip into melted chocolate while keeping the inside soft and creamy.
- Melt the coconut oil gently and allow it to cool slightly before mixing. If it cools too much and begins to harden, warming it briefly will return it to a liquid consistency.
- Coconut Cream
- Cold coconut cream gives the filling its creamy consistency.
- For the best results, refrigerate the can overnight before opening it. This usually separates the thick cream from the thinner coconut liquid. The thick portion works best for creating a rich filling.
- If the coconut cream does not separate, simply shake the can thoroughly before measuring the required amount. The recipe still works well with properly mixed coconut cream.
- Choosing coconut cream without added sugar helps keep the recipe suitable for a keto lifestyle.
- Desiccated Coconut
- Desiccated coconut forms the body of the filling.
- Its fine texture creates bars that hold together well while remaining soft inside. The coconut absorbs the liquid ingredients and gives the filling its familiar texture.
- If desiccated coconut is unavailable, shredded coconut can be used after briefly processing it into smaller pieces.
- Vanilla Extract
- A small amount of vanilla extract enhances the overall flavor without overpowering the coconut. It adds warmth and balances the richness of the coconut oil and cream.
- Sweetener
- This recipe uses a stevia blend, although the sweetness can easily be adjusted according to personal preference.
- Some people enjoy a lightly sweet coconut filling, while others prefer a sweeter dessert similar to traditional candy bars.
- Before shaping the mixture, it’s helpful to taste the filling and adjust the sweetness if necessary.
- Dark Chocolate
- The chocolate coating completes these homemade bars.
- Dark chocolate with a higher cocoa percentage usually contains less sugar, making it an excellent choice for low-carb recipes. It also creates a rich chocolate shell that contrasts nicely with the soft coconut filling.
- The chocolate should melt smoothly without burning. Gentle heating in short intervals works best
Preparing the Coconut Filling
- The filling comes together in only a few simple steps.
- First, melt the coconut oil until completely liquid. Allow it to cool slightly before whisking it together with the coconut cream and vanilla extract.
- Next, stir in the desiccated coconut and sweetener until everything is evenly combined. The mixture should become thick enough to hold its shape when pressed together.
- If the mixture appears slightly dry because of differences in coconut texture, a little additional coconut oil can be mixed in until the consistency improves.
- The goal is a mixture that is moist enough to shape but firm enough to stay together.
Two Simple Ways to Shape the Bars
- There are two reliable methods for forming these homemade coconut bars.
- Hand-Shaped Method
- I usually prefer shaping the bars by hand because it allows me to compress the mixture firmly.
- Taking small portions and pressing them tightly before shaping helps prevent cracks later when dipping them into chocolate.
- This method also creates bars with smooth rounded edges that resemble classic coconut candy bars.
- Slab Method
- When making a larger batch, pressing the mixture into a lined baking pan is another convenient option.
- The mixture should be packed firmly into the pan using the back of a spoon or spatula. Compressing the filling well is important because loose coconut can cause the bars to crumble after slicing.
- After freezing, use a sharp knife to cut even rectangles before coating each one with chocolate.
Freezing Before Dipping
- Freezing is an important step that should not be skipped.
- Around thirty minutes in the freezer allows the coconut mixture to become firm enough for dipping.
- Well-chilled bars are much easier to handle and are less likely to break apart while being coated in melted chocolate.
- If the bars begin to soften during dipping, placing them back into the freezer for several minutes helps restore their firmness.
Melting the Chocolate Correctly
- The chocolate coating should be smooth and glossy.
- Chocolate can be melted either in the microwave using short heating intervals or gently over low heat on the stovetop.
- Stir frequently while melting to prevent overheating.
- If the chocolate seems slightly thick, a small amount of coconut oil can be stirred in while it is still warm to create a thinner coating. However, in warmer climates it is often better to skip the additional oil since it may soften the finished chocolate coating.
Coating the Bars
- Each chilled coconut bar can be lowered into the melted chocolate using a fork or small spatula.
- Rolling the bar gently ensures every side is coated evenly. Lift it carefully and allow excess chocolate to drip away before placing it onto baking paper.
- As the chocolate cools, it forms a firm shell around the soft coconut center.
- The finished bars can remain at room temperature until the chocolate has completely set before transferring them to the refrigerator for storage.
Helpful Tips for the Best Homemade Keto Bounty Bars
- Making these homemade keto bounty bars is quite simple, but paying attention to a few details can make a noticeable difference in the final result. Since the recipe contains only a handful of ingredients, each step contributes to the texture and appearance of the finished bars.
- Chill the Coconut Cream First
- For the creamiest filling, refrigerate the can of coconut cream overnight before using it. Chilling allows the thick cream to separate from the liquid, making it easier to scoop the rich portion needed for the recipe.
- If your coconut cream doesn’t separate after chilling, don’t worry. Shake the can well before opening and use it as directed.
- Compress the Filling Well
- Whether you shape the bars by hand or press the mixture into a pan, make sure it is firmly compressed.
- A tightly packed mixture is much less likely to crumble when dipped into melted chocolate. Taking a little extra time during this step helps produce bars that hold together beautifully.
- Freeze Before Coating
- The coconut filling should be firm before it comes into contact with the melted chocolate.
- Freezing the bars for about 30 minutes makes them easier to handle and helps them keep their shape throughout the coating process.
- Melt Chocolate Gently
- Chocolate should always be melted over low heat or in short microwave intervals.
- Stir frequently until smooth. Overheating can cause the chocolate to become thick or grainy, making it difficult to coat the bars evenly.
Common Mistakes to Avoid
- Although this recipe is beginner-friendly, avoiding a few common mistakes will help ensure great results every time.
- Using Warm Coconut Cream
- Warm coconut cream makes the filling softer and more difficult to shape. Chilled cream creates a firmer mixture that’s easier to work with.
- Not Pressing the Mixture Firmly
- A loosely mixed filling may break apart during dipping. Pressing the mixture together firmly helps every bar stay intact.
- Skipping the Freezing Step
- Trying to dip soft bars into melted chocolate can cause them to fall apart. Chilling the bars first makes the process much easier.
- Overheating the Chocolate
- Chocolate burns easily if heated too quickly. Slow, gentle melting produces the smoothest coating.
- Storage Instructions
- These homemade bars store very well, making them ideal for preparing in advance.
- Refrigerator
- Place the finished bars in an airtight container and refrigerate for up to one week.
- Keeping them chilled helps maintain their shape, especially during warmer weather.
- Freezer
- For longer storage, freeze the bars in a freezer-safe container for up to six months.
- Separate layers with baking paper to prevent sticking.
- When ready to enjoy, allow the bars to sit at room temperature for several minutes before serving.
Serving Suggestions
- These bars are delicious straight from the refrigerator, but allowing them to stand at room temperature for a few minutes creates an even softer coconut filling.
- They pair well with:
- Freshly brewed coffee
- Unsweetened tea
- Iced coffee
- Hot chocolate made with sugar-free ingredients
- A dessert platter featuring other homemade low-carb treats
- They also make a great addition to lunch boxes, holiday dessert trays, or homemade food gift
Recipe Variations
- This recipe can easily be adapted without changing its basic preparation.
- Adjust the Sweetness
- Taste the coconut mixture before shaping and add more or less sweetener depending on your preference.
- Choose Your Chocolate
- Dark chocolate creates a rich finish, while a lower cocoa chocolate will produce a sweeter coating if preferred.
- Use Shredded Coconut
- If desiccated coconut isn’t available, shredded coconut can be pulsed briefly in a food processor before mixing.
- Make Smaller Portions
- Instead of full-sized bars, shape the mixture into bite-sized pieces for easy snacking. Smaller portions also freeze and thaw quickly.
Frequently Asked Questions
- Can I make these bars ahead of time?
- Yes. They are perfect for making in advance and can be stored in either the refrigerator or freezer.
- Why is my filling crumbly?
- The desiccated coconut may be slightly drier than usual. Mix in a little extra coconut oil until the filling holds together comfortably.
- Can I skip the sweetener?
- Yes. The recipe can be prepared without sweetener if you prefer a less sweet coconut filling.
- What should I do if the chocolate is too thick?
- Stir a small amount of coconut oil into the warm melted chocolate until it reaches a smoother consistency. If you live in a hot climate, it’s better to avoid adding extra coconut oil so the coating stays firmer.
- How long do the bars last?
- Store them for up to one week in the refrigerator or up to six months in the freezer when kept in an airtight container.
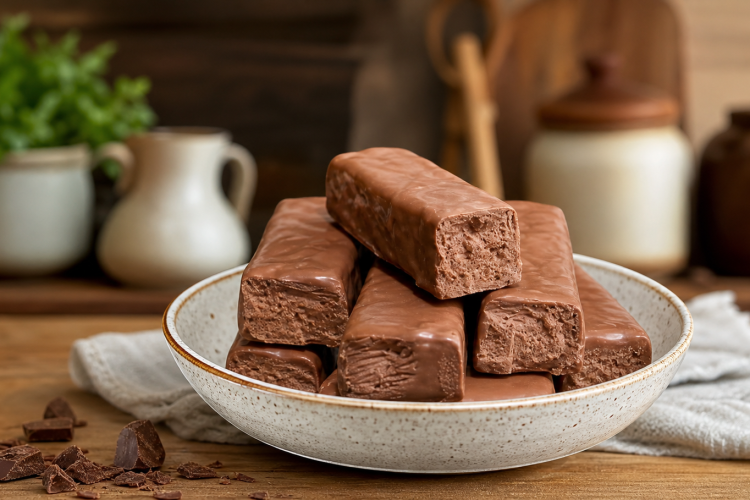
Easy Keto Chocolate Nougat candy
These Homemade Keto Bounty Bars are an easy no-bake treat made with a creamy coconut filling coated in rich dark chocolate. They deliver the classic coconut-and-chocolate combination while remaining suitable for low-carb and sugar-free lifestyles. The bars are simple to prepare, require only a few pantry ingredients, and can be stored in the refrigerator or freezer for whenever a sweet craving strikes.
20
servings10
minutes40
minutes183
kcal50
minutesIngredients
100 grams coconut oil
75 grams coconut cream (scooped from a cold can of coconut cream refrigerated overnight)
200 grams sugar-free desiccated coconut
1 teaspoon vanilla extract
1–2 tablespoons stevia blend (or your favorite sugar-free sweetener, to taste)
200 grams dark chocolate (85% dark chocolate works well)
Directions
- Melt the coconut oil. Heat the coconut oil in the microwave or on the stovetop until completely melted. Set it aside to cool slightly.
- Mix the wet ingredients. In a mixing bowl, whisk together the melted coconut oil, coconut cream, and vanilla extract until smooth. If the coconut oil begins to firm
- Prepare the filling. Add the desiccated coconut and stevia blend (or your preferred sugar-free sweetener) to the wet mixture. Stir until everything is evenly
- Shape the bars. You can either:
Hand Shape: Chill the mixture for a few minutes if needed, then divide it into about 20 portions. Press each portion firmly into a small bar shape. - Chill Until Firm
Arrange the shaped bars on a baking paper-lined tray and place them in the freezer for about 30 minutes, or until they are firm to the touch. If you used the pan method, remove the chilled mixture from the freezer and slice it into evenly sized bars using a sharp knife before coating them with chocolate - Melt the chocolate. Melt the dark chocolate gently in the microwave using short intervals or over low heat on the stovetop, stirring until smooth. If desired, stir in 1 teaspoon of coconut oil to thin the chocolate slightly.
- Coat each bar. Using a fork or dipping tool, lower each frozen bar into the melted chocolate, turning to coat all sides evenly. Lift it out, let the excess chocolate drip off, and place it on a baking paper-lined tray.
- Set the chocolate. Leave the coated bars at room temperature or refrigerate them until the chocolate has completely hardened.
Notes
- Refrigerating the coconut cream overnight helps separate the thick cream from the liquid, making the filling richer.
- If the coconut cream does not separate, shake the can well and use it as is.
- Taste the filling before shaping and adjust the sweetener if desired.
- The sweetener may be replaced with 2 tablespoons of maple syrup or sugar-free (low-carb) maple syru
- ½–1 teaspoon of SweetLeaf Vanilla Cream or Coconut Drops can be used instead of the sweetener. Start with a smaller amount and adjust to taste.
- The sweetener can be omitted for a less sweet version.
- If using shredded coconut instead of desiccated coconut, pulse it briefly in a food processor before mixing.
- If the filling seems dry, mix in a little extra coconut oil until it holds together.
- If the melted chocolate is too thick, add 1 teaspoon to 1 tablespoon coconut oil while it is still warm. In hot climates, it is better not to add extra coconut oil, as it softens the chocolate coating more easily
- Any leftover melted chocolate can be mixed with desiccated coconut, nuts, pepita seeds, or sunflower seeds to make simple chocolate clusters instead of discarding it.
Nutrition Facts
- Serving Size: 20 g
- Total number of serves: 1
- Calories: 184kcal
- Fat: 17g
- Carbohydrates: 3g
- Fiber: 3g
- Protein: 2g


