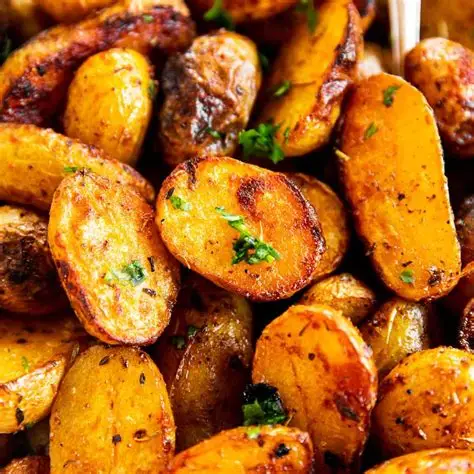
Few side dishes are as universally loved as perfectly roasted potatoes. Crispy on the outside, soft and fluffy on the inside, and packed with savory flavor, roasted potatoes have earned a place on dining tables around the world. Whether served alongside grilled chicken, steak, fish, burgers, sandwiches, or enjoyed completely on their own, they provide comfort, flavor, and satisfying texture in every bite.
Traditionally, roasted potatoes are cooked in an oven, requiring considerable cooking time and often a large amount of oil. However, modern air fryers have revolutionized the process, allowing home cooks to create exceptionally crispy potatoes using less oil and significantly less cooking time. The circulating hot air inside the air fryer cooks the potatoes evenly while developing a beautifully golden exterior that rivals deep-fried potatoes.
This recipe focuses on creating restaurant-quality roasted potatoes with a crisp crust, soft center, and perfectly balanced seasoning. Every step is explained in detail so that even beginners can achieve excellent results. By understanding why each stage matters—from selecting potatoes and removing excess starch to seasoning and temperature control—you can consistently make some of the best roasted potatoes imaginable.
Why Air Fryer Roasted Potatoes Are So Popular
Air fryer roasted potatoes have become a favorite for many reasons. They require less oil than traditional frying methods, cook more quickly than oven roasting, and produce a remarkably crispy texture. The air fryer circulates hot air around each piece of potato, allowing moisture to escape while encouraging browning and crisping.
The result is a potato that is crunchy and golden on the outside while remaining soft, fluffy, and tender on the inside. This contrast in textures is what makes roasted potatoes so irresistible.
Additionally, roasted potatoes are highly customizable. Different herbs, spices, seasonings, and garnishes can completely transform the flavor profile, making them suitable for a wide variety of cuisines and meals.
Ingredients
Main Ingredients
500 to 700 grams potatoes
2 to 3 tablespoons cooking oil
1 teaspoon salt
½ teaspoon black pepper
Flavoring Ingredients
1 teaspoon garlic powder
½ teaspoon paprika
½ teaspoon dried oregano or thyme
Optional Ingredients
Chili flakes
Fresh lemon juice
Fresh parsley
Fresh coriander
Rosemary
Parmesan cheese
Onion powder
Smoked paprika
Fresh garlic
These ingredients create a flavorful coating that enhances the natural taste of the potatoes while helping develop a crisp and golden exterior.
Preparation Time
Preparing the potatoes usually requires approximately fifteen to twenty minutes.
Soaking the potatoes, if chosen, takes twenty to thirty minutes.
Air frying generally requires twenty to twenty-five minutes.
Overall, the recipe can be completed in approximately fifty to sixty minutes, depending on the soaking time and the size of the potato pieces.
Understanding the Importance of Potato Selection
The foundation of great roasted potatoes begins with choosing the right potatoes.
While almost any potato can be used, medium-starch varieties often provide the ideal balance between crispness and tenderness. These potatoes develop a crisp exterior while maintaining a creamy interior texture.
When selecting potatoes, look for specimens that are:
Firm to the touch
Free from wrinkles
Without green discoloration
Free of sprouts
Smooth and undamaged
Fresh potatoes contain the proper moisture balance and starch content necessary for optimal roasting.
Avoid potatoes that feel soft, have deep blemishes, or show signs of sprouting.
Step 1: Washing the Potatoes Thoroughly
Potatoes grow underground and naturally collect dirt and debris on their surface. Proper cleaning is therefore essential.
Place the potatoes under cool running water.
Use your hands or a vegetable brush to scrub away any dirt attached to the skin.
Pay particular attention to crevices and rough areas where soil may remain trapped.
Continue rinsing until the water runs completely clear.
Even if you intend to peel the potatoes, washing them first prevents dirt from transferring onto the flesh during peeling.
Step 2: Deciding Whether to Peel
One of the most common questions when preparing roasted potatoes is whether to remove the skin.
There is no single correct answer.
Leaving the skin attached creates a rustic appearance and provides additional texture. Potato skins become wonderfully crispy during roasting and contribute a rich earthy flavor.
Peeling the potatoes results in a smoother texture and a more refined presentation.
Both options produce excellent results.
Many cooks prefer leaving the skin on because it adds character and reduces preparation time.
Choose whichever method best suits your preferences.
Step 3: Drying the Potatoes Completely
After washing and peeling, thoroughly dry the potatoes.
This step is often underestimated but plays a crucial role in achieving maximum crispness.
Moisture is the enemy of crisp roasted potatoes.
Excess water on the surface turns into steam during cooking, preventing proper browning.
Use clean kitchen towels or paper towels to dry every potato completely.
Take your time during this step because the final texture depends heavily on removing excess moisture.
Step 4: Cutting the Potatoes
Place the potatoes on a sturdy cutting board.
Using a sharp knife, cut them into evenly sized pieces.
Popular shapes include:
Cubes
Wedges
Thick slices
Chunks
Aim for pieces approximately 2 to 3 centimeters in size.
Uniformity is extremely important.
When all pieces are similar in size, they cook at the same rate.
Uneven pieces often result in some potatoes becoming overcooked while others remain undercooked.
Consistency leads to better texture and appearance.
Step 5: Optional Soaking for Superior Crispness
Professional cooks often soak potatoes before roasting.
Place the cut potatoes into a large bowl.
Cover them completely with cold water.
Allow them to soak for twenty to thirty minutes.
During soaking, excess surface starch is released into the water.
Reducing starch helps prevent sticking and encourages crisp browning.
After soaking, drain the potatoes and rinse briefly.
Then dry them extremely well using clean towels.
This second drying stage is just as important as the first.
The potatoes should feel completely dry before moving on to seasoning.
Step 6: Creating the Seasoning Blend
In a small bowl, combine:
Salt
Black pepper
Garlic powder
Paprika
Oregano or thyme
Mix thoroughly.
This seasoning blend creates layers of flavor.
The salt enhances the natural potato taste.
Black pepper adds gentle warmth.
Garlic powder provides savory depth.
Paprika contributes color and mild sweetness.
Herbs introduce aromatic complexity.
You may customize the blend according to your taste.
Additional seasonings such as onion powder, rosemary, Cajun seasoning, smoked paprika, or Italian herbs can be incorporated.
Step 7: Coating with Oil
Transfer the dried potatoes into a large mixing bowl.
Drizzle two to three tablespoons of oil over the surface.
Using your hands or a large spoon, toss thoroughly.
Every piece should receive a thin, even coating.
Oil serves several important functions.
It promotes browning.
It encourages crispness.
It helps seasonings adhere to the surface.
It prevents sticking during cooking.
A light coating is sufficient. Excessive oil is unnecessary when using an air fryer.
Step 8: Applying the Seasonings
Sprinkle the prepared seasoning mixture over the potatoes.
Toss repeatedly until every piece appears evenly coated.
Inspect the bowl carefully.
No large piles of seasoning should remain at the bottom.
Every potato should display a consistent coating of spices and herbs.
This ensures balanced flavor throughout the finished dish.
Step 9: Preheating the Air Fryer
Set the air fryer to 180°C (356°F).
Allow it to preheat for approximately three to five minutes.
Preheating ensures immediate cooking when the potatoes enter the basket.
A properly preheated air fryer helps develop crispness more quickly and reduces total cooking time.
Skipping preheating may result in uneven cooking and less browning.
Step 10: Arranging the Potatoes
Place the seasoned potatoes into the air fryer basket.
Spread them into a single layer whenever possible.
Proper airflow is essential.
The circulating hot air must reach all sides of the potatoes.
Overcrowding restricts airflow and causes steaming rather than roasting.
If necessary, cook in multiple batches.
Patience during this stage produces significantly better results.
Step 11: The First Cooking Phase
Insert the basket into the preheated air fryer.
Cook at 180°C for approximately ten minutes.
During this stage, the potatoes begin softening internally.
The heat penetrates the center while moisture gradually escapes from the surface.
This phase prepares the potatoes for the final crisping stage.
Step 12: Shaking and Turning
After ten minutes, remove the basket carefully.
Shake gently or use tongs to turn the potatoes.
This movement exposes new surfaces to the circulating hot air.
Even exposure ensures uniform browning and crispness.
Return the basket promptly to maintain cooking temperature.
Step 13: Increasing the Temperature
Raise the air fryer temperature to 200°C (392°F).
Continue cooking for an additional ten to fifteen minutes.
This higher temperature is responsible for creating the golden crust that makes roasted potatoes so appealing.
The exterior begins developing a rich color while becoming increasingly crispy.
Step 14: Second Shake
Halfway through the second cooking phase, shake the basket once more.
This prevents sticking and encourages even browning.
Many of the best roasted potatoes owe their uniform color and texture to regular turning during cooking.
Step 15: Checking for Doneness
As the cooking time approaches completion, inspect the potatoes carefully.
The exterior should appear:
Golden brown
Crispy
Slightly textured
Appetizingly roasted
Insert a fork or knife into the center of a potato.
It should slide in easily with little resistance.
This indicates a fully cooked interior.
Step 16: Extra Crisping If Desired
Some people enjoy exceptionally crispy potatoes.
If additional crispness is desired, continue cooking for three to five more minutes at 200°C.
Monitor closely to prevent burning.
Even a few extra minutes can dramatically increase crispness.
Step 17: Resting the Potatoes
Transfer the cooked potatoes to a serving bowl.
Allow them to rest for one to two minutes.
During this brief resting period, the exterior becomes even crispier as steam dissipates.
This small step often improves the final texture significantly.
Step 18: Final Seasoning
Taste a potato.
Adjust seasoning if necessary.
Additional salt, black pepper, chili flakes, garlic powder, or herbs can be added while the potatoes are still hot.
Freshly chopped parsley or coriander adds color and freshness.
A squeeze of lemon juice creates a bright contrast to the rich roasted flavor.
Step 19: Serving Suggestions
These potatoes pair beautifully with:
Grilled chicken
Roasted meats
Fish
Burgers
Steak
Sandwiches
Wraps
Egg dishes
Salads
Vegetable platters
They are equally delicious as a standalone snack served with dipping sauces.
Popular dipping options include:
Ketchup
Garlic sauce
Spicy mayo
Ranch dressing
Yogurt dip
Cheese sauce
Honey mustard
Flavor Variations
Garlic Parmesan Potatoes
Toss hot potatoes with grated Parmesan cheese and fresh garlic.
Spicy Chili Potatoes
Add extra chili flakes and cayenne pepper.
Herb Roasted Potatoes
Use rosemary, thyme, parsley, and oregano.
Lemon Herb Potatoes
Finish with lemon juice and fresh herbs.
Smoky BBQ Potatoes
Use smoked paprika and barbecue seasoning.
Storage and Reheating
Store leftover potatoes in an airtight container in the refrigerator for up to three days.
To restore crispness, reheat them in the air fryer at 180°C for three to five minutes.
Avoid microwaving whenever possible because it softens the exterior.
Final Thoughts
Ultimate Crispy Air Fryer Roasted Potatoes prove that simple ingredients can create extraordinary results. Through careful preparation, proper seasoning, controlled cooking temperatures, and attention to detail, ordinary potatoes transform into a dish that is crispy, flavorful, and deeply satisfying. Whether served as a side dish, snack, appetizer, or meal accompaniment, these golden roasted potatoes offer the perfect balance of crunchy exterior, fluffy interior, and rich savory flavor. Once mastered, this recipe is likely to become one of the most frequently prepared and enjoyed dishes in your kitchen.


