Ingredients
For the Cake Layers
- 220 g gluten-free all-purpose flour (with xanthan gum)
- 60 g unsweetened cocoa powder
- 1 ½ tsp baking powder
- 1 tsp baking soda
- ½ tsp salt
- 200 g granulated sugar
- 120 g unsalted butter, softened
- 2 large eggs, at room temperature
- 1 tsp vanilla extract
- 240 ml buttermilk, at room temperature
- 120 ml hot coffee or hot water (intensifies chocolate flavor)
For Strawberry Filling
- 250 g fresh strawberries, hulled and sliced
- 50 g granulated sugar
- 1 tsp lemon juice
- 1 tsp cornstarch (optional, thickens filling)
For Chocolate Frosting
- 200 g unsalted butter, softened
- 300 g powdered sugar
- 60 g unsweetened cocoa powder
- 3–4 tbsp milk or cream (dairy or plant-based)
- 1 tsp vanilla extract
- Pinch of salt
Optional Decorations
- Whole strawberries
- Chocolate shavings or curls
- Edible flowers
Equipment Needed
- Three 8-inch (20 cm) cake pans
- Parchment paper
- Mixing bowls
- Electric mixer or stand mixer
- Rubber spatula
- Whisk
- Measuring cups and spoons
- Small saucepan (for strawberry filling)
- Offset spatula for frosting
- Cake turntable (optional, helpful for decorating)
Part 1: Preparing Cake Pans
- Preheat oven to 175°C (350°F).
- Grease pans with butter or non-stick spray.
- Line bottoms with parchment paper.
- Lightly dust with cocoa powder to prevent sticking.
Part 2: Making the Cake Batter
Step 1: Dry Ingredients
- Sift gluten-free flour, cocoa powder, baking powder, baking soda, and salt into a large bowl.
- Whisk thoroughly to combine.
Step 2: Creaming Butter and Sugar
- In a separate bowl, beat butter and sugar until pale and fluffy (~3 minutes).
- Beat in eggs one at a time.
- Add vanilla extract.
Step 3: Combining Wet and Dry
- Alternate adding dry ingredients and buttermilk to butter mixture.
- Start and end with dry ingredients.
- Mix on low speed to prevent overbeating.
- Slowly add hot coffee or hot water. Batter will be smooth and slightly thin.
Part 3: Baking the Layers
- Divide batter evenly among prepared pans.
- Smooth the tops with a spatula.
- Bake 25–30 minutes, or until a toothpick inserted comes out clean.
- Cool in pans for 10 minutes.
- Remove from pans and transfer to a cooling rack until completely cool.
Part 4: Preparing Strawberry Filling
- Place sliced strawberries, sugar, lemon juice, and cornstarch in a small saucepan.
- Cook over medium heat for 5–8 minutes until strawberries release juice and thicken slightly.
- Cool to room temperature.
Tip: Chill slightly before layering to prevent soaking cake too much.
Part 5: Preparing Chocolate Frosting
- Beat softened butter until creamy.
- Sift cocoa powder and powdered sugar into bowl.
- Mix gradually, adding milk or cream 1 tbsp at a time until smooth.
- Beat in vanilla extract and a pinch of salt.
Tip: Frosting should be thick but spreadable.
Part 6: Layering the Cake
- Level cake layers if domed.
- Place first layer on serving plate or cake board.
- Spread a thin layer of chocolate frosting on top to act as a “crumb coat.”
- Spread cooled strawberry filling over frosting (~½ cup).
- Place second cake layer on top. Repeat with frosting and filling.
- Top with third cake layer.
Part 7: Frosting the Cake
- Apply a thin crumb coat of frosting all over the cake. Chill 15 minutes.
- Apply a thicker, even layer over sides and top.
- Smooth with offset spatula or spatula.
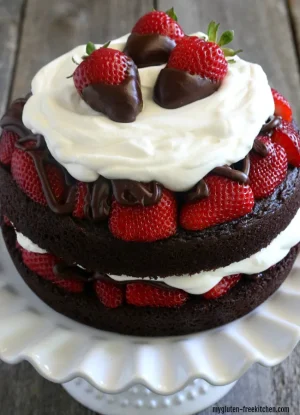
Part 8: Decorating
- Place whole strawberries on top, alternating with chocolate shavings or curls.
- Optional: pipe additional frosting decorations.
Part 9: Chilling
- Chill cake for 1–2 hours before slicing.
- Helps frosting set and makes cutting cleaner.
Texture and Flavor Profile
- Cake: moist, rich chocolate flavor
- Filling: sweet and slightly tart strawberries
- Frosting: creamy, chocolatey, smooth
- Overall: elegant, balanced, and indulgent
