INGREDIENTS AND WHY THEY MATTER
Dry ingredients:
- 1½ cups all-purpose flour
This provides structure. Do not substitute cake flour unless you understand hydration differences. - 1½ teaspoons baking powder
This gives the cake lift and lightness. - ¼ teaspoon baking soda
This reacts with the lemon juice to help the cake rise evenly. - ¼ teaspoon salt
Salt balances sweetness and enhances lemon flavor.
Wet ingredients:
- ¾ cup granulated sugar
Sweetens the cake and helps retain moisture. - 2 large eggs, room temperature
Eggs bind the cake and create structure. Cold eggs can cause curdling. - ⅓ cup neutral oil or melted butter
Oil produces a moister cake; butter adds flavor. Either works. - ¼ cup fresh lemon juice
Provides acidity and lemon flavor. Fresh juice is essential. - 1 tablespoon lemon zest
This is where most of the lemon aroma comes from. - ¼ cup milk or plain yogurt
Adds moisture and softness. Yogurt creates a slightly richer crumb. - 1 teaspoon vanilla extract
Rounds out the lemon flavor and prevents sharpness.
Optional lemon glaze:
- ¾ cup powdered sugar
- 1½ to 2 tablespoons lemon juice
EQUIPMENT YOU WILL NEED
- Air fryer
- 6-inch round cake pan or loaf pan that fits inside the air fryer
- Mixing bowls
- Whisk
- Spatula
- Parchment paper (optional)
- Toothpick or skewer
- Aluminum foil
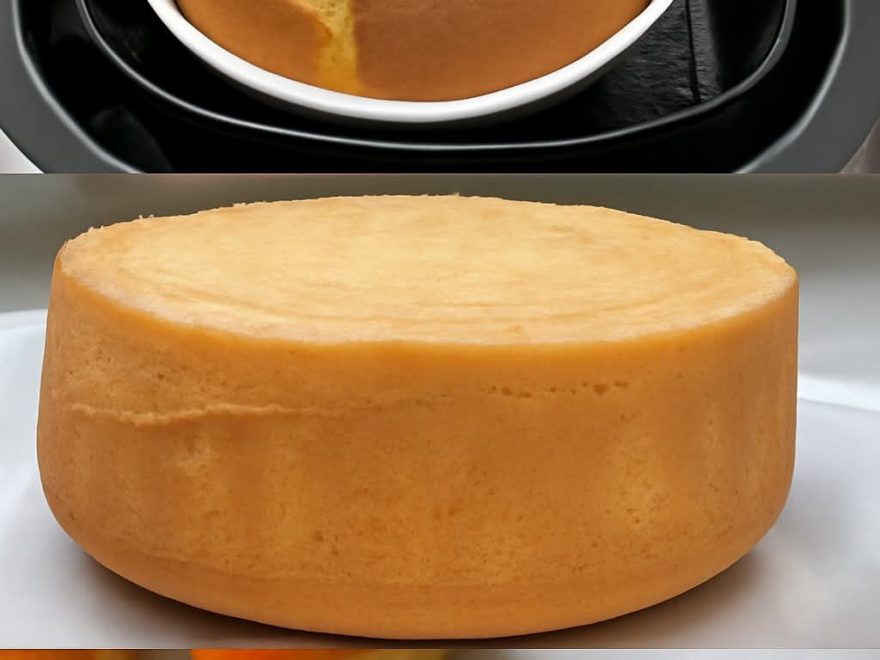
STEP 1: PREPARE THE PAN PROPERLY
Lightly grease the cake pan with oil or butter. If desired, line the bottom with parchment paper. This prevents sticking and allows the cake to release cleanly.
Set the pan aside.
STEP 2: PREPARE THE DRY INGREDIENTS
In a medium bowl, whisk together the flour, baking powder, baking soda, and salt. Whisking aerates the flour and ensures even distribution of leavening. Uneven mixing can cause tunnels or uneven rise.
Set aside.
STEP 3: MIX THE WET INGREDIENTS SLOWLY
In a large bowl, add the sugar and eggs. Whisk until the mixture becomes smooth and slightly pale. This step helps dissolve the sugar and introduces air into the batter.
Add the oil or melted butter and whisk until fully incorporated.
Add the lemon juice, lemon zest, milk or yogurt, and vanilla extract. Mix gently until combined. The batter should look smooth and slightly glossy.
STEP 4: COMBINE WET AND DRY INGREDIENTS
Add the dry ingredients to the wet ingredients in two additions. Use a spatula and fold gently.
Do not overmix. Stop as soon as you no longer see dry flour. Overmixing develops gluten and leads to a dense, tough cake.
The batter should be thick but pourable.
STEP 5: PREHEAT THE AIR FRYER
Preheat the air fryer to 320°F for 3 to 5 minutes.
This temperature is intentionally lower than oven baking. Air fryers cook more aggressively, and higher heat will brown the top too fast while leaving the center undercooked.
STEP 6: FILL THE PAN
Pour the batter into the prepared pan. Tap the pan gently on the counter to remove air bubbles. Smooth the top with a spatula.
Do not fill the pan more than two-thirds full. The cake needs room to rise.
STEP 7: BAKE THE CAKE — FIRST PHASE
Place the pan in the air fryer basket.
Bake at 320°F for 20 minutes without opening the air fryer. This allows the cake to rise evenly.
STEP 8: CHECK AND PROTECT THE TOP
After 20 minutes, quickly check the cake. If the top is already golden or browning too quickly, loosely cover the cake with aluminum foil. Do not press the foil down; it should sit lightly on top.
Return the cake to the air fryer.
STEP 9: CONTINUE BAKING
Continue baking for another 10 to 15 minutes, still at 320°F.
Total baking time will be about 30 to 35 minutes, depending on your air fryer and pan depth.
The cake is done when a toothpick inserted into the center comes out clean or with a few moist crumbs.
STEP 10: COOLING THE CAKE CORRECTLY
Remove the cake from the air fryer and place it on a heat-safe surface.
Let the cake cool in the pan for 10 minutes. This allows the structure to set.
After 10 minutes, carefully remove the cake from the pan and place it on a cooling rack. Let it cool completely before glazing or slicing.
Cutting too early will cause the cake to collapse or become gummy.
OPTIONAL STEP: LEMON GLAZE
In a small bowl, whisk powdered sugar with lemon juice until smooth and pourable. Adjust thickness as needed.
Drizzle the glaze over the completely cooled cake. Let it set for 10 to 15 minutes before slicing.
FINAL TEXTURE AND FLAVOR
- Soft, tender crumb
- Moist interior
- Light, even rise
- Balanced lemon flavor
- Gentle sweetness with fresh citrus aroma
