When I want to make chicken that feels a little special without spending a long time in the kitchen, this air fryer honey garlic chicken is one of the recipes I turn to. The chicken comes out lightly crisp on the outside and stays tender inside, then gets coated in a warm honey garlic sauce that is sweet, savory, glossy, and full of flavor.
What I like most about this recipe is that there is very little hands-on cooking. I cut the chicken into small pieces, give it a light coating of starch, and let the air fryer do most of the work. While the chicken is cooking, I make the sauce on the stovetop. Once both are ready, everything comes together in just a few minutes.
It is the kind of meal that works especially well on a busy weekday. I usually serve it over cooked rice with steamed vegetables, but noodles or another vegetable side work just as well.
A Simple Homemade Chicken Dinner
- The combination of crispy chicken and sticky honey garlic sauce is what makes this dish so satisfying. The starch coating gives the chicken a crisp surface without needing a deep fryer, while the sauce brings together honey, soy sauce, brown sugar, ketchup, garlic, and ginger.
- The flavors are familiar and comforting, but the finished dish still feels different from an ordinary chicken dinner.
- For this recipe, I prefer boneless, skinless chicken thighs because they stay juicy during air frying. Chicken breast can also be used, although it needs less cooking time because it can dry out more quickly.
What You Need
Chicken
- For the chicken, I use:
- 6 boneless and skinless chicken thighs
- Cornstarch or potato starch, for coating the chicken
- The chicken is cut into bite-sized pieces before cooking. Keeping the pieces close to the same size helps them cook more evenly.
- Potato starch can give the chicken a particularly crisp coating, while cornstarch works very well too. Either one can be used without changing the basic method.
Honey Garlic Sauce
- The sauce is made with:
- ½ cup honey
- ½ cup soy sauce2 tablespoons brown sugar2 tablespoons ketchup
- 1 clove garlic
- ½ teaspoon ground ginger1 tablespoon cornstarch
- If I am making the recipe gluten-free, I use gluten-free soy sauce. The remaining sauce ingredients stay the same.
- The honey gives the sauce its sweetness and sticky texture, while soy sauce adds saltiness and depth. Brown sugar makes the glaze richer, and ketchup adds a little tang. Garlic and ginger round everything out
For Serving
- I serve the chicken with:
- Cooked rice
- Steamed green beans or other vegetables
- Sliced green onions
- Rice is especially useful here because it soaks up the extra sauce. Green beans or another steamed vegetable add freshness and make the meal feel complete.
Preparing the Chicken
- I start by cutting the chicken thighs into small, bite-sized pieces. I try not to make some pieces very large and others very small because they will finish cooking at different times.
- Once the chicken is cut, I place it in a large bowl and sprinkle it with cornstarch or potato starch. I toss everything together until the chicken has a thin, even coating.
- The coating should not be excessively thick. I just want enough starch to cover the surface of each piece. This is what helps create the crisp texture once the chicken goes into the air fryer.
- If I want a little extra browning, I lightly spray the coated chicken with oil. This is optional, so the chicken can be cooked without it as well.
Getting the Air Fryer Ready
- I preheat the air fryer to 390°F (200°C) before adding the chicken.
- Preheating gives the chicken a hot cooking environment from the beginning and helps the outside start crisping quickly.
- Once the air fryer is hot, I arrange the chicken pieces in the basket in a single layer. I avoid piling or stacking the pieces because the hot air needs room to circulate around them.
- If the basket is too small to hold all the chicken comfortably in one layer, it is better to cook it in batches than to overcrowd it.
Air Frying the Chicken
- I cook the chicken for about 24 minutes, turning or shaking the basket around the halfway point.
- At about 12 minutes, I check the chicken and turn the pieces so that they cook and brown more evenly. The exact cooking time can vary between air fryer models and depending on the size of the chicken pieces.
- The chicken should be fully cooked in the center and golden and crisp on the outside.
- For food safety, chicken should reach an internal temperature of 165°F (74°C) at the thickest part.
- When using chicken breast, I start checking earlier because it generally cooks faster than thighs.
Making the Honey Garlic Sauce
- While the chicken is cooking, I prepare the sauce.
- I add the honey, soy sauce, brown sugar, ketchup, garlic, and ground ginger to a small saucepan. I place the saucepan over low to medium heat and stir the mixture gently as it warms.
- I do not use high heat because the honey and brown sugar can burn easily. The goal is to warm the sauce and bring the flavors together rather than rapidly boil it.
- Once the sauce begins to bubble gently, I prepare the cornstarch slurry.
- In a small bowl, I mix the tablespoon of cornstarch with a little water until smooth. I then slowly add the mixture to the warm sauce while stirring continuously.
- As the sauce heats, the cornstarch thickens it. Within a short time, it should become glossy and sticky enough to coat the chicken.
- If the sauce becomes thicker than I want, I loosen it with a small splash of water. If it is still too thin, I can add a little more cornstarch mixed with water.
Bringing the Chicken and Sauce Together
- Once the chicken is cooked, I take it out of the air fryer and add it to the saucepan with the honey garlic sauce.
- I gently toss the chicken until every piece is covered. The hot chicken immediately picks up the sticky glaze, and the crisp coating becomes coated in the sweet and savory sauce.
- I let the chicken sit in the sauce for about 1 to 2 minutes, stirring gently. This gives the glaze a chance to cling to the chicken and allows the flavors to settle into the crispy pieces.
- I avoid cooking the chicken in the sauce for too long because I still want some of that crisp texture from the air fryer.
Serving the Chicken
- I spoon cooked rice into bowls or onto plates and add the glazed chicken on top.
- There is usually some sauce left in the pan, so I spoon a little extra over the chicken and rice. It makes the rice much more flavorful.
- For vegetables, steamed green beans are an easy choice, but other vegetables can be served alongside the chicken as well.
- Finally, I scatter sliced green onions over the top. They add a fresh flavor and a little crunch that balances the richness of the glaze.
How I Keep the Chicken Crispy
- The most important thing for crisp chicken is not overcrowding the air fryer basket. If the pieces are packed together, steam can build up and prevent the coating from browning properly.
- I also make sure the chicken has an even coating of starch. A light coating is enough; there is no need to bury the chicken under a thick layer.
- Turning the chicken halfway through cooking helps expose different sides to the hot air and encourages more even browning.
- Once the chicken is coated with sauce, it will naturally become softer than it was straight from the air fryer. That is expected. For the best balance between crispiness and sauciness, I coat the chicken shortly before serving.
Using Chicken Breast Instead
Adjusting the Sauce
- The sauce has a noticeably sweet and savory flavor because it contains both honey and brown sugar. If I prefer a less sweet result, I can reduce the honey while keeping the rest of the listed ingredients.
- For a gluten-free version, I use gluten-free soy sauce.
- If I want some heat, chili flakes or sriracha can be added. These additions are optional and do not need to be included in the basic recipe.
- The sauce thickness is also easy to adjust. A little extra water loosens a sauce that has become too thick, while additional cornstarch slurry can help thicken a sauce that is too thin.
Making It a Complete Meal
- I usually serve this chicken with rice and vegetables because the combination is simple and filling.
- Steamed green beans work particularly well, but the meal can also be served with other vegetables. The sweet and salty sauce pairs nicely with plain rice because the rice absorbs some of the glaze without competing with the chicken.
- For a different presentation, I can serve the chicken over noodles instead of rice.
- Sliced green onions make a simple finishing touch and add color to the plate.
Storing Leftovers
- If there are leftovers, I transfer the cooled chicken to an airtight container and keep it in the refrigerator for up to 3 days.
- Because the chicken is coated in sauce, it will not remain as crisp as it was immediately after air frying. The flavor, however, holds up well.
- When reheating, I use gentle heat and avoid overheating the sauce because the honey and sugar can become very hot and sticky.
- If possible, reheating the chicken in the air fryer can help bring some texture back to the outside
A Few Things to Keep in Mind
- There are a few simple details that make this recipe easier.
- First, cut the chicken pieces evenly. This helps them finish cooking at roughly the same time.
- Second, do not overcrowd the air fryer. Give the pieces enough space for the hot air to move around them.
- Third, keep the sauce over low to medium heat. Sugar-based sauces can burn quickly when exposed to high heat.
- Finally, prepare the sauce while the chicken cooks so both parts of the recipe are ready at about the same time.
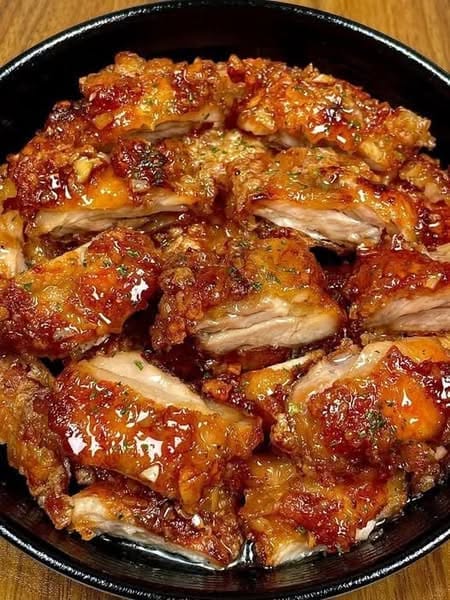
Air Fryer Honey Garlic Chicken
 Recipe by admin1
Crispy air-fried chicken pieces coated in a sweet, savory, and sticky honey garlic sauce. Served with rice, steamed vegetables, and green onions, this is an easy homemade meal for lunch or dinner.
4
servings10
minutes25
minutes629
kcal35
minutesIngredients
6 boneless, skinless chicken thighs
Cornstarch or potato starch, for coating
½ cup honey
½ cup soy sauce
2 tablespoons brown sugar
2 tablespoons ketchup
1 clove garlic, crushed or finely chopped
½ teaspoon ground ginger
1 tablespoon cornstarch
A little water, for mixing with the cornstarch
Cooked rice
Steamed green beans or other vegetables
Sliced green onions
Directions
- Cut the chicken thighs into small, even bite-sized pieces.
- Place the chicken in a large bowl and coat evenly with cornstarch or potato starch.
- Preheat the air fryer to 390°F (200°C).
- Arrange the chicken in a single layer in the air fryer basket. Lightly spray with oil if desired.
- Air fry for about 24 minutes, turning or shaking the chicken halfway through cooking.
- While the chicken cooks, add honey, soy sauce, brown sugar, ketchup, garlic, and ginger to a small saucepan.
- Heat the sauce over low to medium heat, stirring gently until it begins to bubble.
- Mix the cornstarch with a little water in a small bowl to make a smooth slurry. Slowly add it to the sauce while stirring.
- Continue stirring until the sauce becomes thick and glossy. Add a small splash of water if it becomes too thick.
- Once the chicken is fully cooked, transfer it to the saucepan and gently toss it in the honey garlic sauce.
- Cook and stir for 1–2 minutes, allowing the sauce to coat the chicken.
- Serve over cooked rice with steamed vegetables and sliced green onions.
Notes
- Chicken thighs stay juicier than chicken breast.
- If using chicken breast, begin checking it earlier because it cooks faster.
- Do not overcrowd the air fryer basket.
- Potato starch can be used instead of cornstarch for the chicken coating.
- Use gluten-free soy sauce for a gluten-free version.
- Reduce the honey if you prefer a less sweet sauce.
- Chili flakes or sriracha can be added for heat.
- Store leftovers in an airtight container in the refrigerator for up to 3 days.
- Reheat gently to prevent the honey-based sauce from burning.
- Cooking time may vary depending on the air fryer and the size of the chicken pieces.
Nutrition Facts
- Total number of serves: 4
- Calories: 296kcal
- Fat: 25g
- Saturated Fat: 7g
- Cholesterol: 150mg
- Sodium: 1850mg
- Carbohydrates: 65g
- Fiber: 1g
- Sugar: 51g
- Protein: 36g


