While the biscuit base chills, I move on to the strawberry topping. I like preparing this before the cheesecake filling because it needs enough time to cool completely. Adding warm fruit over the filling can soften the cheesecake layer, so patience here makes a noticeable difference in the final result.
I begin by washing the strawberries thoroughly under cold running water. After removing the green tops, I slice the berries into small, even pieces so they cook at the same rate. Smaller pieces also make the topping easier to spread later without creating thick, uneven patches.
The sliced strawberries go into a medium saucepan along with the granulated sugar, water, and lemon juice. I cook everything over medium heat, stirring occasionally. Within a few minutes, the strawberries start releasing their natural juices, filling the kitchen with a sweet fruity aroma. As the berries soften, they become tender while still keeping some texture, which makes the finished topping much more enjoyable than a completely smooth puree.
To thicken the mixture, I stir the cornstarch together with the cold water until there are no lumps. This smooth mixture is slowly poured into the saucepan while stirring continuously. Within another two or three minutes, the topping transforms into a glossy sauce that coats the spoon nicely.
Once it reaches the right consistency, I remove the saucepan from the heat and leave it to cool naturally. I never rush this step because a completely cooled topping keeps every cheesecake layer neat and distinct after assembly.
Preparing the Creamy Cheesecake Filling
- The cheesecake filling is the heart of this dessert, so I like to prepare it slowly without rushing any step.
- I always begin with softened cream cheese because it blends much more smoothly than cold cream cheese straight from the refrigerator. After placing it in a large mixing bowl, I beat it with an electric mixer until it becomes silky and completely free of lumps.
- Next, I gradually add the powdered sugar while continuing to mix. Adding it little by little helps everything combine evenly and prevents small pockets of sugar from remaining in the mixture.
- Once the sugar has dissolved, I mix in the sour cream or Greek yogurt. This ingredient gives the filling a pleasant tang while making the texture even creamier. The vanilla extract follows, adding warmth and sweetness, while the fresh lemon juice and lemon zest brighten the flavor and balance the richness of the dairy ingredients.
- At this stage, the filling already looks smooth and creamy, but it becomes even lighter after folding in the whipped cream.
Whipping the Cream
- Cold heavy whipping cream always produces the best volume, so I keep it refrigerated until the moment I need it.
- I pour the cold cream into a separate bowl and whip it until medium peaks form. I stop mixing once the cream holds its shape while still looking soft and smooth. Overwhipping can cause the cream to become grainy, so I prefer checking it frequently as it thickens.
- Instead of stirring the whipped cream into the cream cheese mixture, I gently fold it in using a rubber spatula. Folding preserves the air trapped inside the whipped cream, creating a filling that feels light and fluffy rather than dense.
- Working gently during this step helps maintain a smooth texture that sets beautifully after chilling.
Preparing the Gelatin
- Gelatin gives this no-bake cheesecake enough structure to slice neatly without changing its creamy consistency.
- I sprinkle the unflavored gelatin evenly over the cold water and leave it untouched for about five minutes. During this time, the gelatin absorbs the water and blooms properly.
- After blooming, I warm it gently for a few seconds until it dissolves completely. I make sure it never reaches a boil because excessive heat can affect how well it sets later.
- Once the gelatin cools slightly, I slowly pour it into the cheesecake filling while gently mixing. This allows it to blend evenly throughout the mixture without creating streaks or lumps.
- The finished filling should be silky, airy, and completely smooth, ready for layering.
Assembling the Cheesecake Box
- Now comes my favorite part—bringing all the prepared components together.
- I remove the chilled biscuit base from the refrigerator and check that it feels firm to the touch. This creates a stable foundation for the creamy filling.
- Using an offset spatula, I spread half of the cheesecake mixture evenly over the biscuit layer. I take my time smoothing the surface because neat layers make the finished dessert look much more appealing when sliced.
- Once the filling is level, I spoon half of the cooled strawberry topping over it. Rather than pouring it all into one spot, I place small spoonfuls across the surface before gently spreading them into an even layer. This prevents disturbing the cheesecake beneath.
- The remaining cheesecake filling is then carefully added over the strawberries. Again, I smooth the surface before finishing with the remaining strawberry topping.
- Sometimes I lightly swirl the strawberry topping using the back of a spoon to create a decorative pattern. It gives the cheesecake an attractive homemade finish without requiring any special decorating skills.
- After assembly is complete, I cover the dish tightly with plastic wrap or a fitted lid before placing it into the refrigerator.
The Importance of Chilling Time
- One of the easiest ways to achieve a perfect no-bake cheesecake is simply allowing enough time for it to chill.
- Although the cheesecake begins setting after several hours, I prefer leaving it in the refrigerator overnight whenever possible. During this time, the gelatin firms the filling, the biscuit base becomes more stable, and all the flavors blend together naturally.
- The longer resting time also improves the texture, making each slice cleaner and easier to serve.
- Trying to cut the cheesecake too early usually results in soft layers that don’t hold their shape, so I always plan ahead and prepare this dessert the day before serving
Decorating Before Serving
- Once the cheesecake has fully chilled, it’s time for the finishing touches.
- I begin by whipping the remaining heavy cream together with the powdered sugar until stiff peaks form. This whipped cream is transferred into a piping bag whenever I want a decorative finish, although simply spreading it across the top also looks lovely.
- I pipe small swirls around the edges or across the surface before arranging fresh strawberry slices between them. The bright red berries instantly make the dessert look fresh and inviting.
- A light sprinkle of crushed biscuits adds a little crunch while tying the decoration back to the buttery crust underneath.
- To complete the presentation, I scatter a few white chocolate shavings across the top. If I have fresh mint leaves available, I add a few small sprigs for extra color and freshness.
- The finished cheesecake has beautiful layers that make it just as attractive to look at as it is to eat.
Serving Suggestions
- I always serve this cheesecake well chilled because the cool temperature keeps the filling firm and creamy.
- For the cleanest slices, I use a sharp knife and wipe the blade clean after every cut. This simple step keeps the layers looking neat and professional.
- This dessert pairs wonderfully with freshly brewed coffee for an afternoon treat, while iced tea makes it especially refreshing during warm weather. On cooler days, a cup of hot chocolate complements the creamy cheesecake beautifully.
- For special occasions, I sometimes serve each slice with a few extra fresh berries on the side. A small scoop of vanilla ice cream can also turn it into an even more indulgent dessert.
- Whether served after dinner or enjoyed as an afternoon treat, this cheesecake always feels refreshing without being overly rich.
Helpful Tips for the Best Results
- A few small details can make a big difference in the final texture of this dessert.
- I always use full-fat cream cheese because it produces a richer and smoother filling. Allowing it to soften before mixing prevents lumps and creates a silky consistency.
- Cold whipping cream is essential for achieving good volume, but I avoid whipping it for too long. Soft to medium peaks are ideal before folding it into the filling.
- The strawberry topping must cool completely before layering. Even slightly warm fruit can soften the cheesecake and blur the distinct layers.
- When preparing the biscuit base, I make sure it is pressed firmly into the dish. A loose crust tends to crumble when serving.
- I also taste the cheesecake filling before adding the dissolved gelatin. This is the only stage where the sweetness can easily be adjusted according to personal preference.
- Finally, I never shorten the chilling time. Giving the cheesecake enough time to set produces the smooth, creamy texture that makes every slice hold together perfectly.
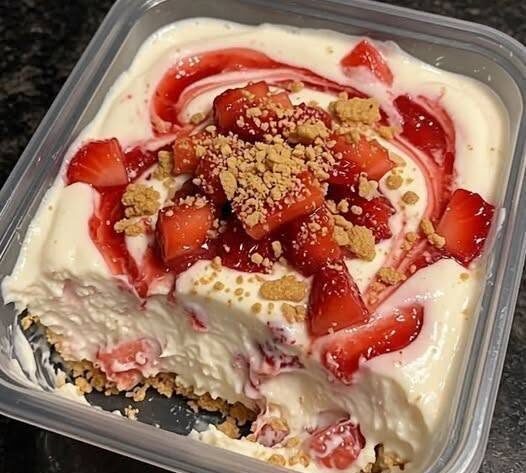
No-Bake Strawberry Cheesecake Box
A few small details can make a big difference in the final texture of this dessert.
I always use full-fat cream cheese because it produces a richer and smoother filling. Allowing it to soften before mixing prevents lumps and creates a silky consistency.
Cold whipping cream is essential for achieving good volume, but I avoid whipping it for too long. Soft to medium peaks are ideal before folding it into the filling.
The strawberry topping must cool completely before layering. Even slightly warm fruit can soften the cheesecake and blur the distinct layers.
When preparing the biscuit base, I make sure it is pressed firmly into the dish. A loose crust tends to crumble when serving.
I also taste the cheesecake filling before adding the dissolved gelatin. This is the only stage where the sweetness can easily be adjusted according to personal preference.
Finally, I never shorten the chilling time. Giving the cheesecake enough time to set produces the smooth, creamy texture that makes every slice hold together perfectly.
12
servings35
minutes10
minutes300
kcalIngredients
300 grams digestive biscuits or graham crackers
150 grams unsalted butter, melted
2 tablespoons granulated sugar
1 teaspoon vanilla extract
A small pinch ofr salf
Directions
- Crush biscuits and mix with sugar, salt, melted butter, and vanilla. Press into a dish and chill.
- Cook strawberries with sugar, water, and lemon juice. Add cornstarch slurry, cook until thickened, then cool completely.
- Beat cream cheese with powdered sugar, sour cream, vanilla, lemon juice, and zest. Fold in whipped cream.Dissolve bloomed gelatin, cool slightly, and mix into the cheesecake filling.
- Dissolve bloomed gelatin, cool slightly, and mix into the cheesecake filling.
- Layer half the filling, strawberry topping, remaining filling, and topping over the crust.
- Chill for 6–8 hours or overnight. Decorate with whipped cream, strawberries, crushed biscuits, white chocolate shavings, and mint before serving.Chill for 6–8 hours or overnight. Decorate with whipped cream, strawberries, crushed biscuits, white chocolate shavings, and mint before serving.
Notes
- Use full-fat cream cheese for the creamiest texture
- Make sure the strawberry topping is completely cool before adding it to the cheesecake layers.
- Chill the cheesecake for at least 6–8 hours for the best texture and clean slices.
- Keep the dessert refrigerated until ready to serve
- Store covered in the refrigerator for up to 4 days.
- The cheesecake can be frozen without decoration for up to 1 month; thaw overnight in the refrigerator before serving.
Nutrition Facts
- Calories: 420kcal
- Fat: 31g
- Sodium: 240mg
- Carbohydrates: 31g
- Fiber: 2g
- Sugar: 22g
- Protein: 6g
- Calcium: 98mg


