Here is your very detailed, foolproof, high-protein weekend dessert recipe — written step-by-step with extra guidance so you can achieve perfect results even on your first attempt.
HIGH-PROTEIN LUXURY BAKED CHEESECAKE
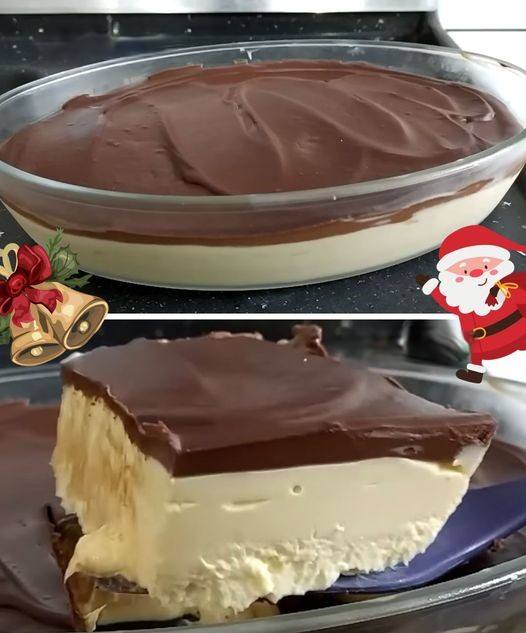
Creamy, Dense, Smooth, and Packed with Protein
This is not just a “healthy cheesecake.” This is a properly structured, bakery-style baked cheesecake that happens to be high in protein. It is rich, thick, creamy, and satisfying while delivering impressive macros. The texture is smooth and velvety, not rubbery or dry. It slices beautifully and tastes even better the next day.
This recipe yields 10 large slices or 12 moderate slices.
WHY THIS RECIPE IS FOOLPROOF
• Balanced ratio of cream cheese, Greek yogurt, and cottage cheese
• Whey protein enhances structure without drying the cake
• Cornstarch prevents cracking
• Gentle baking temperature
• Water bath ensures even cooking
• Slow cooling method eliminates collapse
INGREDIENTS
For the Protein Oat Crust:
- 1½ cups oat flour (or blended rolled oats)
- ¼ cup vanilla whey protein powder
- 2 tablespoons honey or maple syrup
- 3 tablespoons melted unsalted butter or coconut oil
- 2–4 tablespoons milk (add gradually)
- Pinch of salt
For the High-Protein Filling:
- 450 g reduced-fat cream cheese, fully softened
- 1½ cups (340 g) thick plain Greek yogurt (nonfat or 2%)
- 1 cup (220 g) full-fat cottage cheese
- ¾ cup granulated sugar or granulated sweetener
- 2 scoops (about 50 g) vanilla whey protein powder
- 3 large eggs, room temperature
- 1 teaspoon vanilla extract
- 1 tablespoon cornstarch
- Pinch of salt
- Optional: zest of ½ lemon for brightness
EQUIPMENT
- 8 or 9-inch springform pan
- High-speed blender or food processor
- Electric hand or stand mixer
- Large roasting pan
- Aluminum foil
- Cooling rack
STEP 1: PREPARING THE PAN PROPERLY
Preheat oven to 325°F (163°C).
Wrap the outside of the springform pan tightly with 2–3 layers of aluminum foil. This prevents water from leaking into the crust during the water bath.
Lightly grease the inside of the pan. You may line the bottom with parchment paper for easier removal.
STEP 2: MAKING THE PROTEIN OAT CRUST
In a bowl, combine oat flour, protein powder, salt, and honey. Stir in melted butter.
Add milk gradually, one tablespoon at a time, until the mixture resembles damp sand and holds together when pressed.
Press mixture firmly and evenly into the bottom of the pan using the bottom of a glass. Compacting it well prevents crumbling later.
Bake for 8–10 minutes until lightly golden and set.
Remove and allow to cool completely before adding filling.
STEP 3: BLENDING THE COTTAGE CHEESE
Place cottage cheese into a blender or food processor. Blend until completely smooth and creamy. This step is crucial. Unblended cottage cheese will create lumps in the cheesecake.
Set aside.
STEP 4: MAKING THE FILLING
Ensure all ingredients are room temperature. This prevents lumps and overmixing.
In a large mixing bowl, beat softened cream cheese on low speed until completely smooth. Scrape down sides frequently.
Add Greek yogurt and blended cottage cheese. Mix gently on low speed until combined.
Add sugar, vanilla, salt, lemon zest (if using), and cornstarch. Mix just until incorporated.
Add protein powder slowly while mixing on low speed. Do not overmix.
Add eggs one at a time, mixing gently after each addition. Stop mixing as soon as each egg is incorporated.
Overmixing introduces air, which causes cracks.
STEP 5: ASSEMBLING AND WATER BATH
Pour filling over cooled crust.
Tap pan gently on counter to release trapped air bubbles.
Place springform pan into a large roasting pan.
Pour hot water into roasting pan until it reaches halfway up the sides of the cheesecake pan.
This water bath ensures slow, even baking and a silky texture.
STEP 6: BAKING
Bake for 55–70 minutes.
The edges should be set, but the center should still jiggle slightly when shaken. It should resemble firm gelatin in the center.
Do not wait until the center is fully firm — that means overbaking.
STEP 7: SLOW COOLING METHOD
Turn off the oven but leave the cheesecake inside with the door slightly open for 1 hour.
This gradual temperature change prevents cracks and sinking.
After 1 hour, remove from oven and water bath. Run a thin knife around the edges to loosen the cake from the pan.
Allow to cool at room temperature for another hour.
Refrigerate for at least 6 hours, preferably overnight.
TEXTURE EXPECTATION
After chilling, the cheesecake should be:
• Firm on the outside
• Creamy and smooth inside
• Dense but not heavy
• Sliceable with clean edges
OPTIONAL HIGH-PROTEIN TOPPINGS
Greek Yogurt Vanilla Cream:
Mix ½ cup Greek yogurt with 1 tablespoon honey and a dash of vanilla.
Chocolate Protein Ganache:
Melt 60 g dark chocolate and mix with 2 tablespoons warm milk and 1 scoop chocolate protein powder.
Berry Compote:
Simmer fresh or frozen berries with a splash of water and sweetener for 5–7 minutes.
NUTRITIONAL INFORMATION (Approximate)
Per slice (1/10 of cake):
Calories: 320 kcal
Protein: 25 g
Carbohydrates: 22 g
Fat: 16 g
Saturated Fat: 7 g
Sugar: 12 g
Fiber: 2 g
Sodium: 300 mg
Entire cake protein: approximately 250 grams.
Values vary depending on brands used.
COMMON MISTAKES TO AVOID
Using cold ingredients
Skipping the water bath
Overmixing the batter
Overbaking
Removing from pan while warm
Using low-quality protein powder
FREQUENTLY ASKED QUESTIONS
Can I make it without protein powder?
Yes, replace with 2 tablespoons cornstarch. Texture remains good but protein decreases.
Can I freeze it?
Yes. Wrap tightly and freeze up to 2 months. Thaw overnight in refrigerator.
Can I make mini cheesecakes?
Yes. Bake in lined muffin tin for 18–22 minutes.
Why is high-protein cheesecake slightly denser?
Protein powder absorbs moisture and increases structure, creating a slightly firmer texture.
Can I reduce calories further?
Yes. Use reduced-fat cream cheese and a granulated sweetener.


